Publishing a Lapp
When you publish a Lapp –
- You’ll receive a –
- Secure API URL and security token for each environment (test and live). This security token should be passed in the request header as x-api-key.
- Public Lapp API where the security token is passed as a query string parameter
- Calls to the Lapps API URL should always be POST.
- Once a Lapp is published, if you’ve written logs, the Logs option will appear in your navigation menu.
- Published Lapps can be used in automation, webhooks and rules and notifications in your LeadSquared application.
Note: To learn more about calling Lapps APIs, please refer to Invoking Lapp APIs.
Procedure
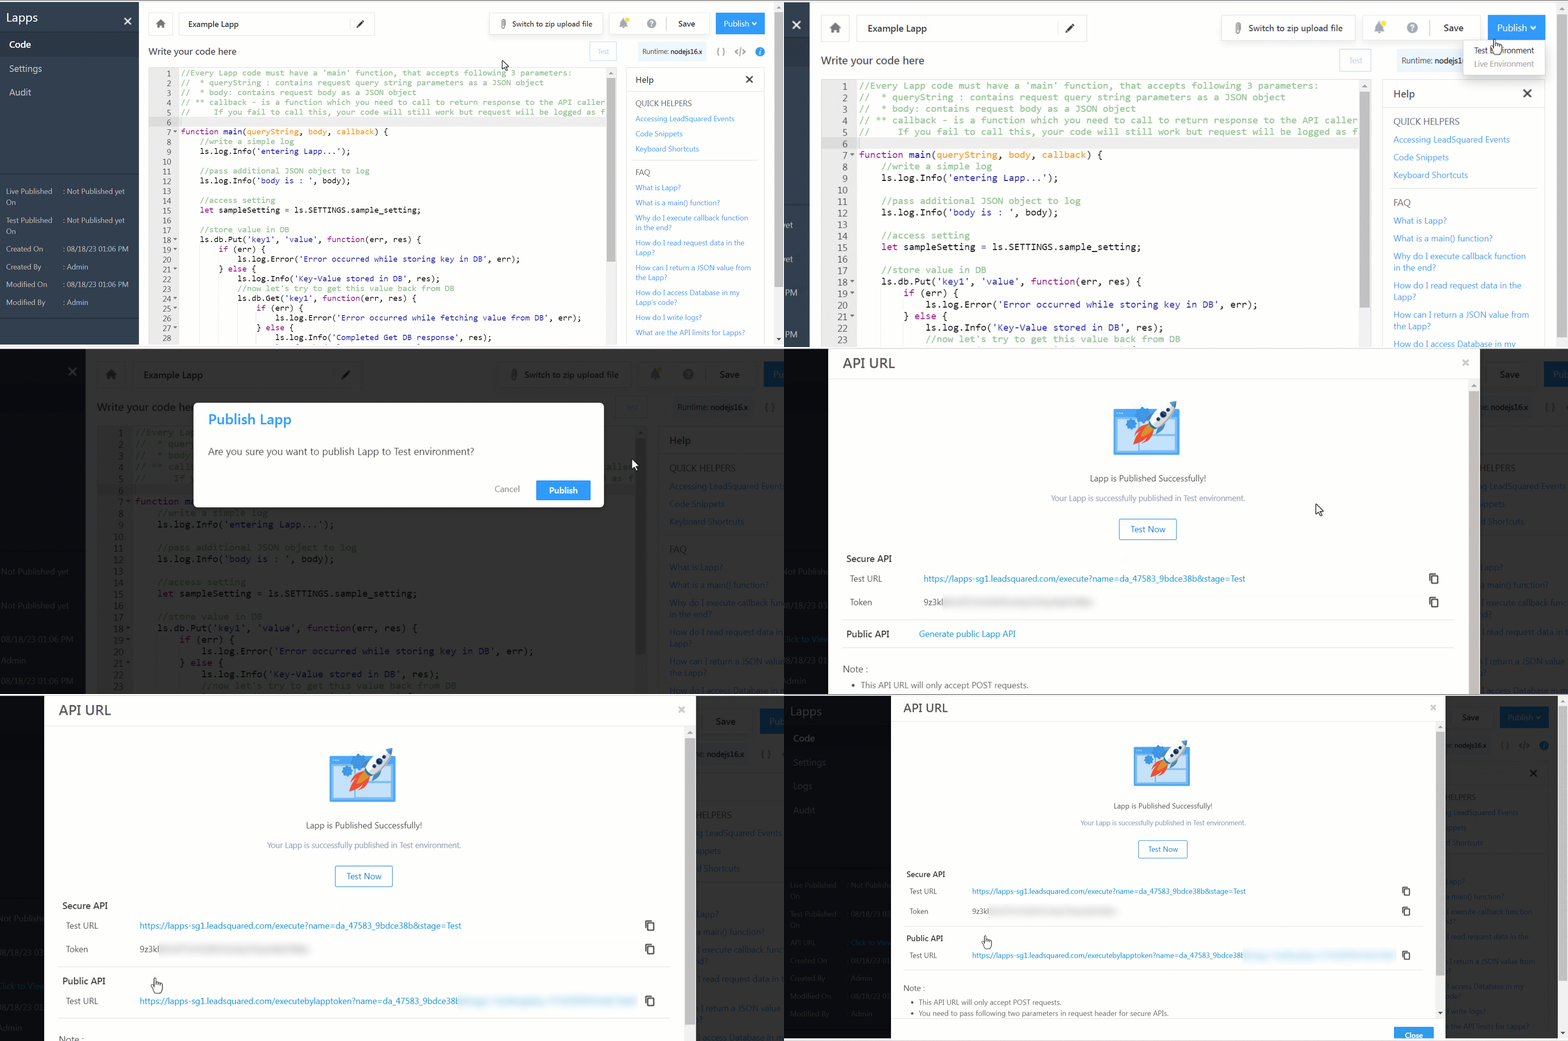
- Click the Save button to save your code.
- Once your code is saved, the Publish button will appear alongside the Save button. When you click the Publish button, the option to publish your Lapp to the test environment will appear. You can only publish a Lapp to live once it is published to the test environment.
- Once published to test, you’ll see a pop-up with your API URL and Token.
- The Logs link will also appear in your navigation menu on the left side of the page.
Generate Public Lapp API
Lapps can be configured to be called with the security/authentication token passed in the query string. This token is generated individually for each Lapp when requested. The token is passed as the xapikey query string parameter.
To generate a token for Lapp, open the API URL section and click Generate public Lapp API.
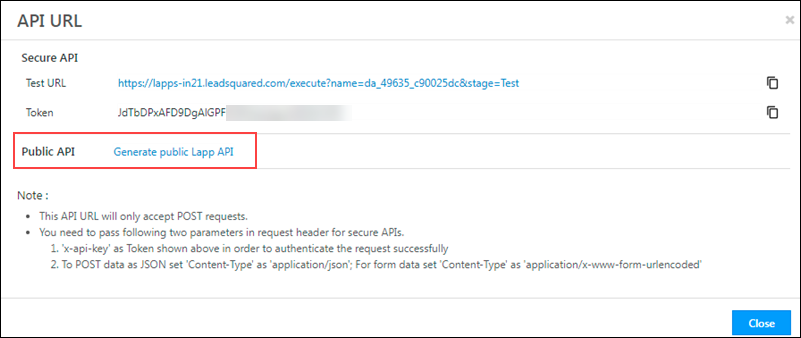
Note: Never expose the x-api-key in the browser directly via client-side scripts outside the LeadSquared domain. We advise you to always invoke Lapp APIs from the server side.
If it’s absolutely necessary to invoke the Lapp API from the client side outside the LeadSquared domain or from 3rd party apps that don’t support passing the x-api-key in the request header, always use the Public Lapp API that compromises access only to that particular Lapp.
Test a Lapp
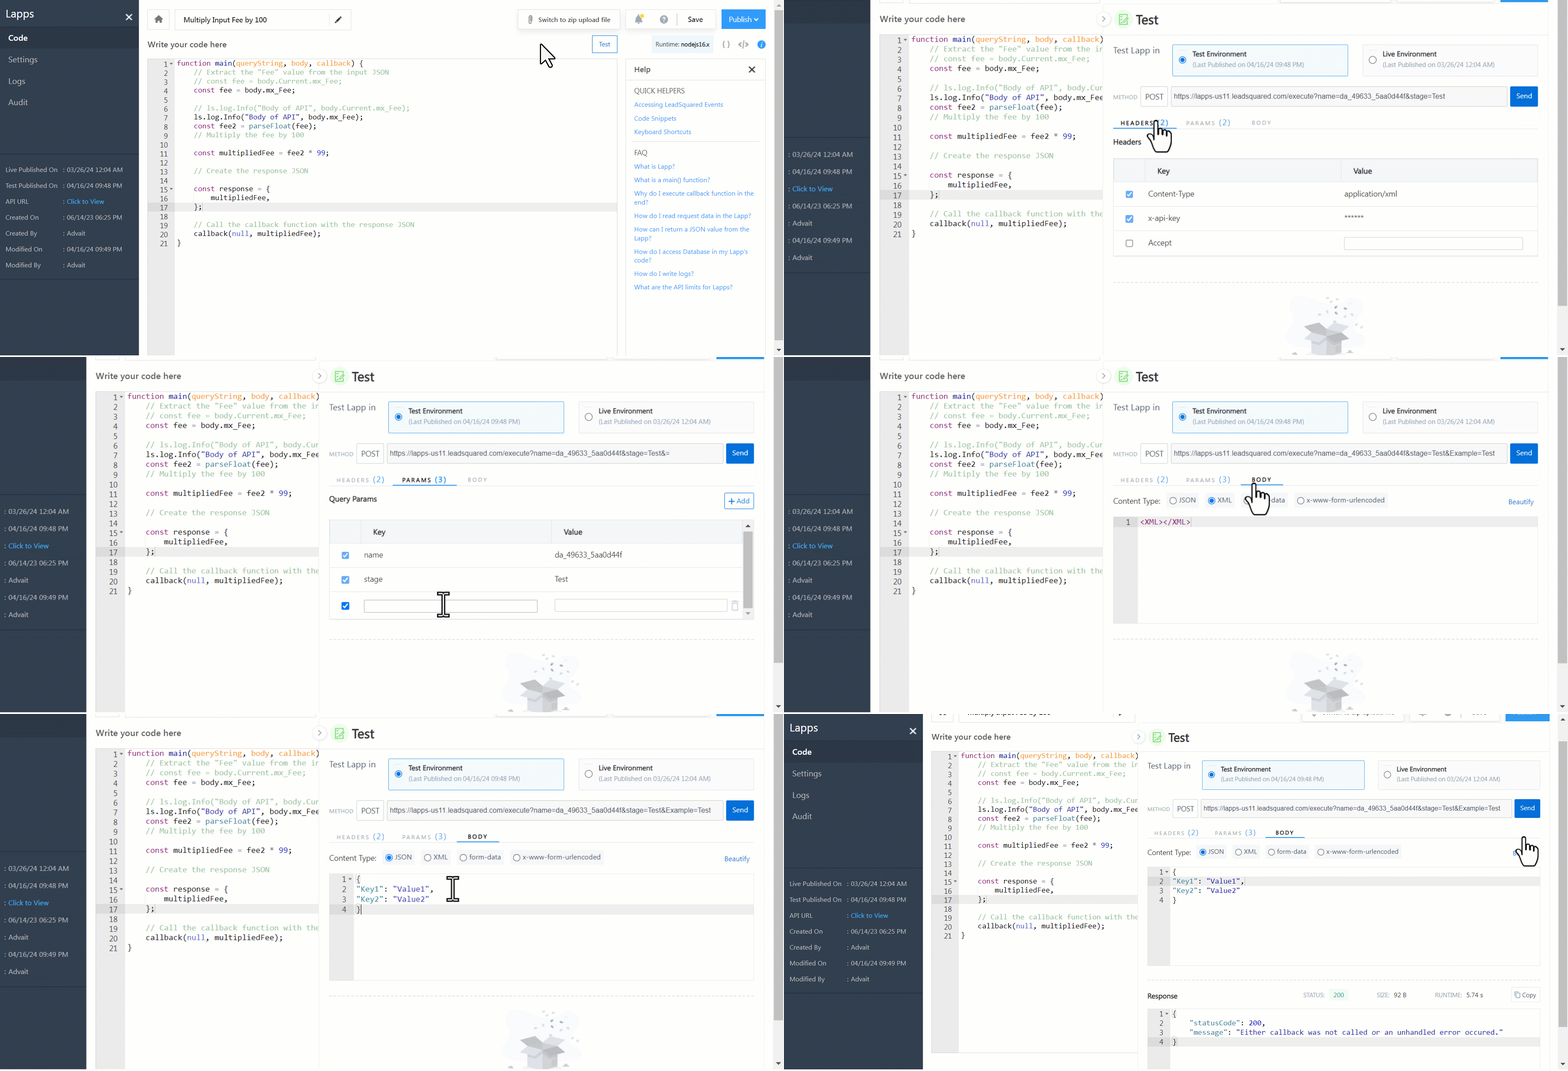
After publishing a Lapp to the test environment, click Test to test your Lapp right within the Lapps Editor. Once you publish to the live environment the option to test the Lapp in the live environment will also be enabled.
- Click the corresponding option to test the Lapp in the test or live environment.
- The API URL and some of the query parameters are hardcoded and cannot be modified, i.e., name and stage. However, you can pass additional query parameters by clicking Add Param.
- Only the ‘Accept’ header can be modified. The use case of the ‘Accept’ header is to return the response as XML. Pass the ‘Accept’ header as “application/xml”. This will auto-convert your JSON response to XML.
- Under the body section, select the content-type (JSON, XML, form-data and x-www-form-urlencoded). The inbuilt editor allows you to easily spot mistakes. Click Beautify to format the payload.
- When you’re ready, click Send.
- Scroll down to view the response. Click Copy to copy the response.
Note:
- Additional parameters/data added to the request body will be saved/retained for 2 days until modified. However, if you add files under the form-data content type, the uploaded files will be retained while navigating to different sections of the Lapps screen, but will not be retained once the page is refreshed.
- If you switch between body content types, data will remain stored in both the previous and current body content types unless the Test Lapp screen is minimized or the Lapp is invoked. Once the Test Lapp screen is minimized or the Lapp is invoked, the most recently modified body content type data will be retained.
- Lapp invocation response will be retained in the panel even if a user navigates to multiple sections of the Lapps screen like Code, Settings, Logs, etc. However, the response will be cleared on page reload, or switching to another environment (test or live) for Lapp invocation.
- Lapps invocation request and response body are wrapped by default for better readability.
View Logs
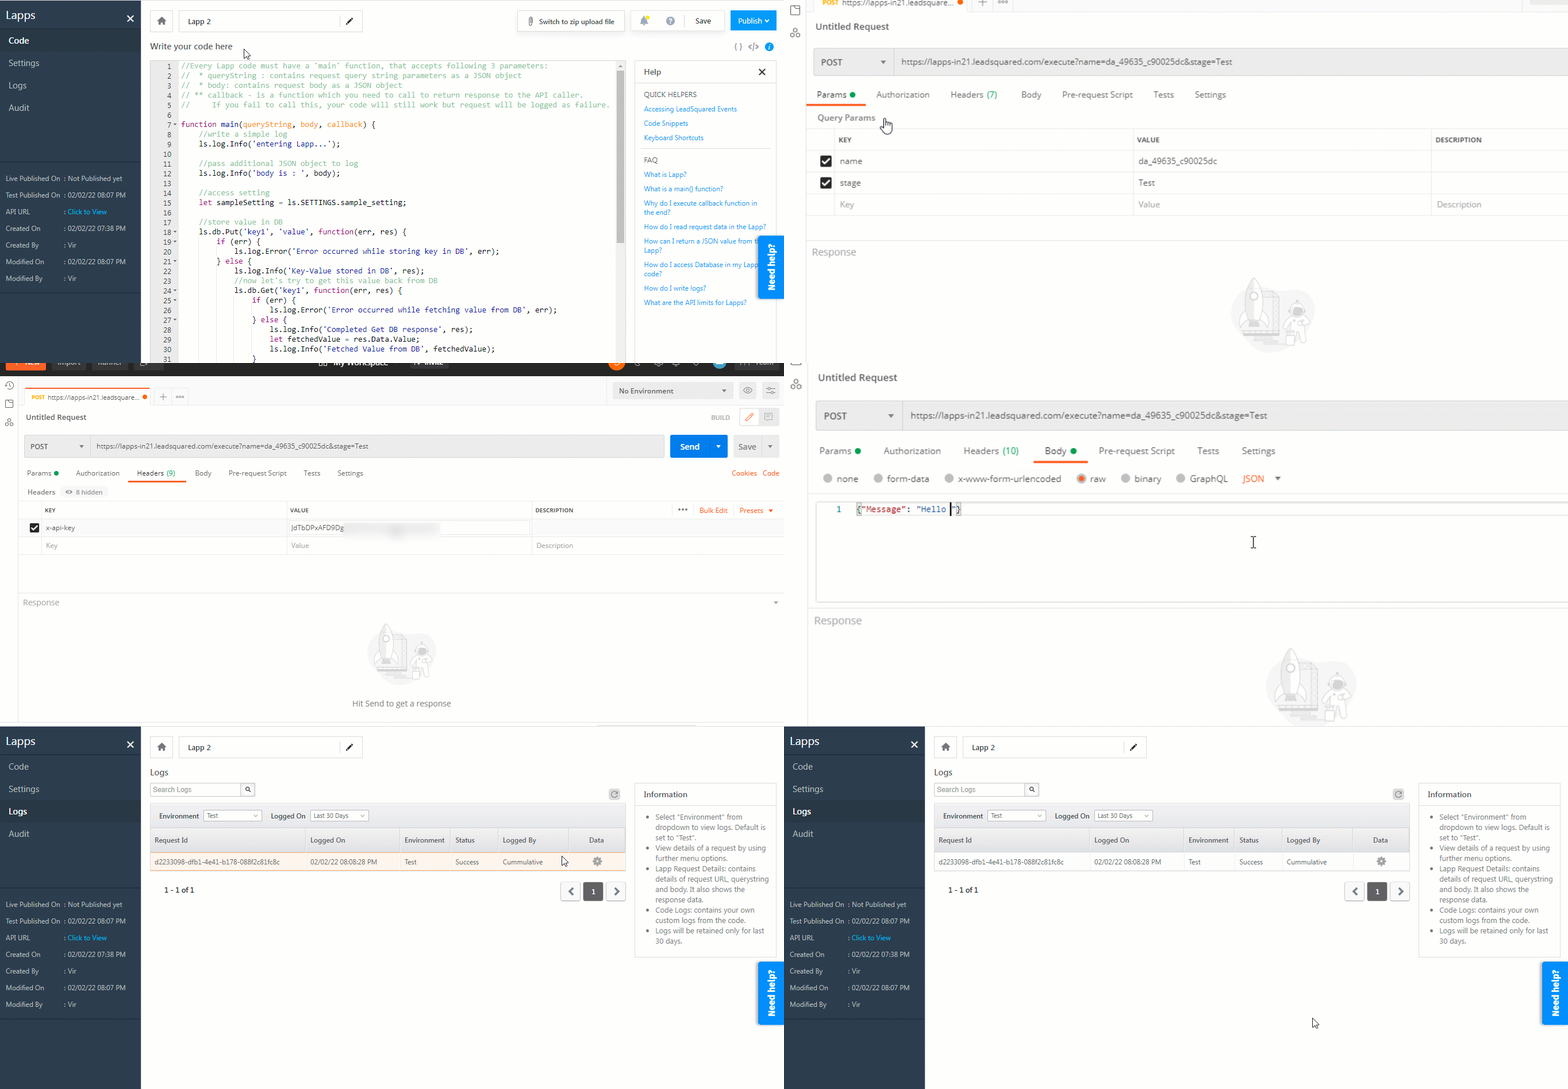
Logs will only appear after your Lapp is published. In the example below, we’re pushing some data to a Lapp using Postman (https://www.getpostman.com) and then reviewing the logs –
- Copy and paste the Lapp API URL in Postman (you can use any similar tool).
- Set the HTTP Method to POST.
- Create the API Header “x-api-key” in Postman and copy and paste the Lapp security token.
- Pass the API body (“Message”: “Hello World” in this example) in JSON format.
- Click the Logs option in the navigation pane in LeadSquared.
- Click the Edit (wheel) icon to view Lapp Request Details and Code Logs.
Note:
- Only the enabled Log Levels (e.g., Debug, Error, Fatal, etc.) will be displayed.
- There might be a delay of maximum 1 minute between calling the Lapp API and the logs showing up.
- Logs will be auto-deleted after a certain period of time.
- You can filter logs based on date & time using the Logged On Custom Type filter

Export Logs
You can export the Lapps logs to your local computer as a .zip file. You’ll receive an email with a link to download the exported file. Download and unzip the file to view the logs in CSV format.
Note: The link is only valid for 6 hours. You can raise another export request if the link expires.

Lapps Audit History
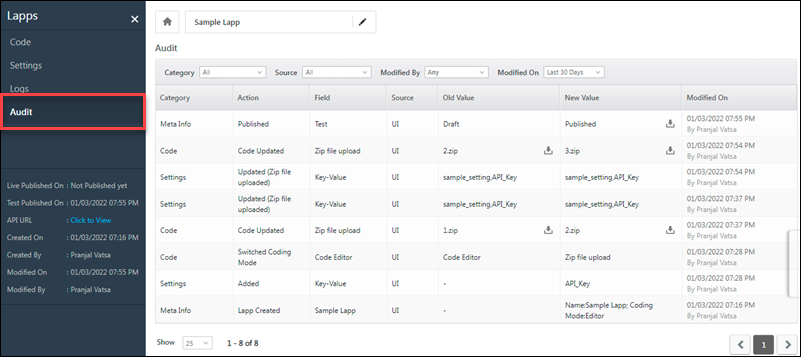
The Audit section records changes made to meta-information (name, description, published/unpublished, etc.), settings, and code for each Lapp. You can also export the code by clicking the download ![]() icon.
icon.
The following filters are available –
- Category – All, Meta Info, Code, Settings.
- Source – Filters requests based on origin: All, UI, SDK, API.
- Modified By – Filters the changes by user.
- Modified On – Filters the changes by date.
Lapps Usage Report
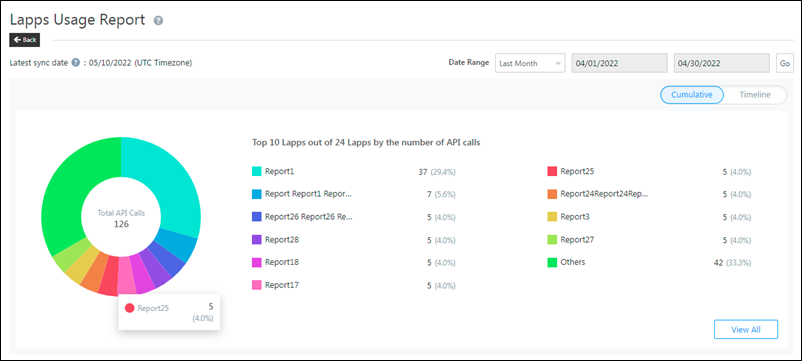
The Lapps Usage Report presents data on the number of API calls and usage percentage across all Lapps in your account.
Next Steps
After publishing a Lapp you can call it from –


