
Webhooks
Webhooks are user-defined HTTP callbacks, which are triggered when a specific event occurs. Webhooks offer simple and efficient server to server communication, without having to depend on long-running connections. When an Event occurs in the source site, webhooks makes an HTTP request to the URL configured. You can use webhooks to integrate your applications with LeadSquared.
Some of the common use cases where you might find Webhooks useful include posting form data to another application, posting lead data to another application and so on.
To know the best way to implement webhooks, see Webhooks Best Practices.
Prerequisites
- You must be an admin user.
- You must have a webhook URL you want to send data to.
Create a Webhook
- Navigate to My Account>Settings>API and Webhooks>Webhooks.
- Fill in the webhook details. The Event (triggers the HTTP callback request) and Webhook URL (In most cases HTTP is sufficient, but HTTPS can be useful if your data is sensitive) fields are mandatory.
- Click Save when you’re done.
Note: Information is sent as an HTTP POST request to the URL which you specify.
| Field | Description |
| Type | Select ‘Webhook’ to create a regular webhook. Select ‘Lapp’ to create a new Lapp (see Lapps). |
| Event | The LeadSquared event you want to trigger the HTTP callback request on. Use the checkbox to ‘Notify on failure’ for failed webhook executions. If checked, all administrator users in the LeadSquared account will be notified. |
| Webhook URL | The URL you want to post data to once the event occurs. |
| Content Type | The format you want to post the data in. Choose from ‘application/json’ to post data in JSON format, ‘application/x-www-form-urlencoded’ for simple text/ ASCII data or ‘text/plain’ for plain text. |
| Execution Delay | You can set a delay (in seconds) between the time the event occurs and the data is posted. |
| Custom Headers | Add a name-value pair as a custom header. You can use custom headers for authentication or security purposes. For example, you can enter a custom name-value pair and then reject all webhook calls where the header isn’t present. |
| Description | Describe your webhook. For example, “New Lead Data”. |
Webhook History
You can view the webhook execution history. Hover your cursor over the Actions button and click on View History. You can see the transmission date, its status and data transmitted.
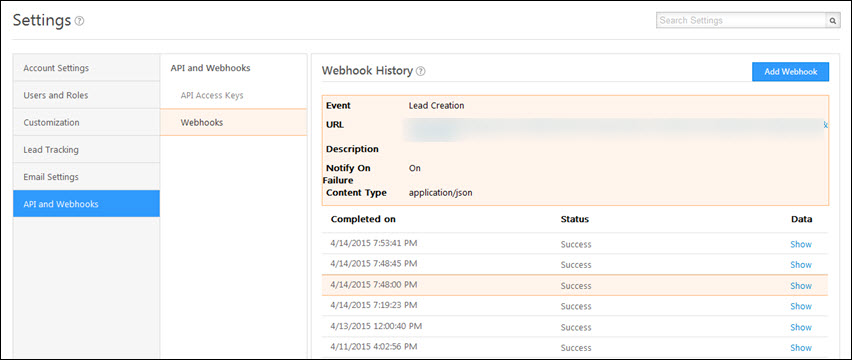
- You’ll see the status as Success if the URL entered returns the HTTP code 200.
- You’ll see the status as Failure if the URL entered returns an HTTP code other than 200. We try 3 times before marking an attempt as a failure. In addition to this, you will see the status as In Queue if the data is not yet posted to the URL.
Note: You can debug a Failure status by doing a manual HTTP post with the input data to the webhook URL.
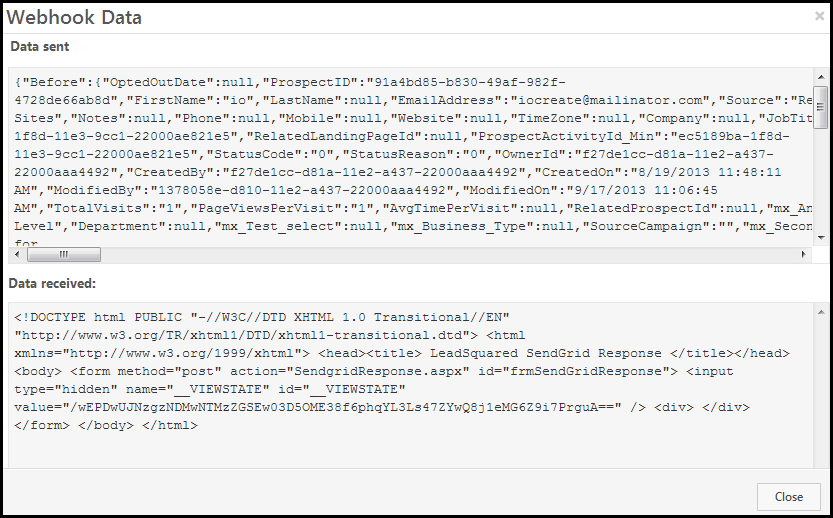
Click on Show to view the data that is transmitted. Webhook Data window opens up. Here, you can view the data sent and received.
Webhook APIs
You can also programmatically create webhooks using API –
All Webhook Events
- Account Activity Create
- Account Activity Update
- Account Create
- Account Delete
- Account Update
- Landing Page Submission
- Lead Activity Creation
- Lead Activity Update
- Lead Creation
- Lead Delete
- Lead Field Value Change
- Lead Merge
- Lead Ownership Change
- Lead Score Change
- Lead Stage Change
- Lead Update
- Leave Create
- Leave Delete
- Leave Update
- Opportunity Create
- Opportunity Delete
- Opportunity Field Value Change
- Opportunity Stage/Status Change
- Opportunity Update
- Product Create
- Product Delete
- Product Update
- Task Cancel
- Task Complete
- Task Create
- Task Reminder
- Task Update
- User Activate/Deactivate
- User Availability Status Change
- User Create
- User Update
Notes: Activities are posted in bulk on the webhook. The activity data for activities happened in one minute is grouped and posted on the webhook. So you will need to check if you receive one activity id or more than one.
- For data posted for each activity event Activity Webhook Information.
Webhook Data Format
We append webhook URL with three important parameters entityType, entityId and eventType.
- entityType tells you who posted the data on the url – the values could be “webhook”, “rule” or “automation”
- entityId tells you the id of webhook or rule that posted the data
- eventType tells you type of trigger action. Example values are SalesActivity_Post_Create, SalesActivity_Post_Update and SalesActivity_Post_Cancel. Here trigger action is Sales Activity, post type is POST (it will be GET or POST) and action is Create, Update and Cancel respectively
For example, in your webhook URL https://api.yourcompany.com/leads/add, we could add following (if its triggered on sales activity update):
https://api.yourcompany.com/leads/add?entityType=Webhook&entityId=b329c2b2-854c-11e6-8f87-22000aa8e760&eventType=SalesActivity_Post_Update.
We post the data on your webhook URL in JSON format.


