
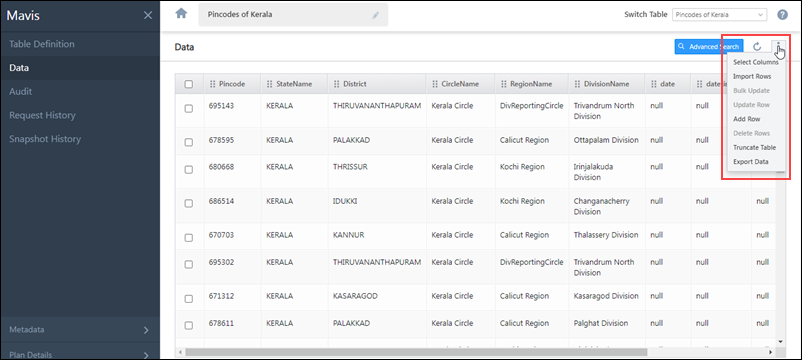
Manage Mavis Data
All the columns created in the Table Definition screen will be displayed on the Data screen. On this screen, you can perform the following operations –
- Select Columns
- Import Rows
- Insert Rows
- Update Rows
- Upsert Rows
- Search Data
- Re-order Columns
- Update a Row
- Bulk Update Rows
- Add a Row
- Delete Rows
- Truncate Table
- Export Data
Note: User specific advanced search filters, column ordering and sorting are retained when navigating from one tab to another (e.g., from the data tab to the audit tab and back) or refreshing the page.
Select Columns
By default, all the columns in your Mavis table are displayed on the grid. To customize the grid and display only the columns you require, click Select Columns.
On the Select Columns pop-up, click the checkbox ![]() alongside the columns you want to view/hide on the grid. You can search for a specific column and also toggle between All and Selected columns.
alongside the columns you want to view/hide on the grid. You can search for a specific column and also toggle between All and Selected columns.
Note:
- Search is case-insensitive.
- At least one column must be selected.
- To select all the columns, on the Select Column pop-up, alongside Column Name, click
 .
.
Import Rows
To populate your table with data –
- First, you’ll have to upload the CSV source file.
- Map the columns in the CSV file to the corresponding column within the table.
- Then, validate the CSV file. The validations that might show up are Validation Success and Validation Failed.
- Once the status is Validation Success or Validation Failed (Partially), click the Import button.
Note: You cannot perform the Import Rows action for columns containing the User data type.
Source
To import a CSV source file to your table –
- Navigate to the Data screen, and on the right of your screen, hover your cursor over the
 icon, and click Import Rows.
 - On the Import via CSV screen, from the below options, Select Import Behaviour –
- Create new record(s) only – Data present in the CSV file will get created as new records in the table. Existing rows in the Mavis table will not get updated.
- Update existing row(s) only – Based on the Search Key defined, existing rows found in the CSV file will get updated in the corresponding table rows. If the Search Key value does not match the table value, no new records will get created in the table.
- Upsert (Create new record(s) & update existing) – Based on the Search Key defined, existing rows found in the CSV file will get updated in the corresponding table rows. If the Search Key value does not match the table value, new records will get created in the table.
- Click Download Sample. The sample file is generated dynamically and it contains the schema names of all the columns created in the Table Schema.
- On the sample CSV file, enter relevant data in the correct data type under each column, and save the file.
- If you are not using the sample CSV file, and are instead creating new a CSV file/uploading an existing CSV file to update the table, specify the header names (column names) in the first row, and add data across the subsequent rows.
- Click Upload, and add the relevant CSV file.
- Alternatively, you can drag-and-drop the CSV file.
- Once you’re done, click Next.
Notes:
- In a single Import action, you can import up to 1-lakh (100,000) rows.
- The only file format supported is a “.csv” file in the UTF-8 format.
- The CSV file must not contain duplicate column names.
- The following column names aren’t accepted in the CSV file –
- __LSQValidationMessage
- __LSQValidationStatus
- mv_CreatedOn
- mv_CreatedBy
- mv_ModifiedOn
- mv_ModifiedBy
- The maximum file size allowed is 50MB.
- The maximum table size allowed is 40GB.
Column Mapping
Once you’ve uploaded the CSV file, you will have to map it against the corresponding column within the table.
- If the column names in the CSV file are the same as the column names in the table column, then the columns are automatically mapped. Else, from the CSV Column Name dropdowns, you must map the columns to the correct Column Name in Mavis.
- For Mandatory Fields, map the Column Name in Mavis on the left to the corresponding CSV Column Name on the right.
- All columns that are marked Unique or Non-Nullable are considered mandatory columns.
- Once you’re done, click Save.
- If there are no mandatory columns in the table, the Mandatory Fields option will be disabled, and you’ll not be able to expand or view it.
- Once you’ve mapped and saved the mandatory columns, for Non-Mandatory Fields, map the remaining non-mandatory CSV Column Name on the left to the corresponding Column Name in Mavis on the right. Note that the order of column mapping is reversed in this step (the CSV Column Name is on the left).
- All fields marked Is Nullable are considered as non-mandatory columns.
- The mandatory Mavis columns mapped in the previous step will not show up in the list of options in this step.
- This step is optional. If you choose to skip it, click Save and continue with the other steps.
- If there are no non-mandatory columns in the table, the Non-Mandatory Fields option will be disabled, and you’ll not be able to expand or view it.
- If all the columns under CSV Column Name are mapped, the Non-Mandatory Fields option will be disabled, and you’ll not be able to expand or view it.
- If DateTime columns are present in the Table Schema –
- From the Date/Time format in CSV section, select the same Date/Time/DateTime formats given in CSV File.
- If table schema contains either of Date/DateTime/Time columns, or its combinations, but not all three columns, then in Date/Time format in CSV section, you can choose only those available column formats. Other formats will be disabled.
- Below are the default formats –
- Date – yyyy-MM-dd
- DateTime – yyyy-MM-dd HH:mm:ss
- Time – HH:mm:ss
- If there are no Date/Time/DateTime fields in the table schema, then this section will remain greyed out and inaccessible.
- Once you’re done, click Next.
Notes:
- Different DateTime fields in the CSV file should follow one uniform format. You cannot upload different format DateTime fields in the same CSV file.
- For example, in your CSV file, you cannot have one column in the dd-MM-yyyy HH:mm:ss format, and another column in the MM/dd/yyyy HH:mm:ss format.
- Date, Time and DateTime fields will be stored in the default formats in the Mavis DB.
-
You can import user lookup field data in bulk through the following supported import methods –
- User ID–Include the User ID in your CSV file.
- Email Address–Use the Email Address of users for import.
- JSON Object–Store user data using a JSON object with either an Email Address or User ID. For example,
{ "EmailAddress": “example@domain.com” }or{ "UserId": “78029ab2-8509-11ed-94e4-120cab83a541” }
Validation
The data in the CSV file will be validated on this screen.
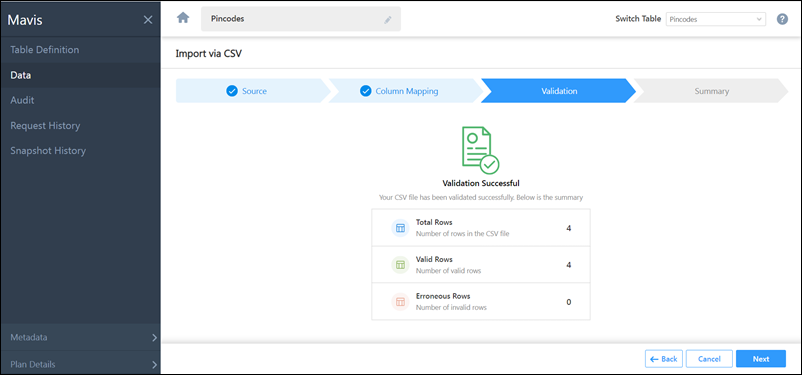
If Validation Success –
If all the row(s) have been successfully validated, you’ll get the Validation Success message. You can choose to continue the CSV file import process by clicking Next.
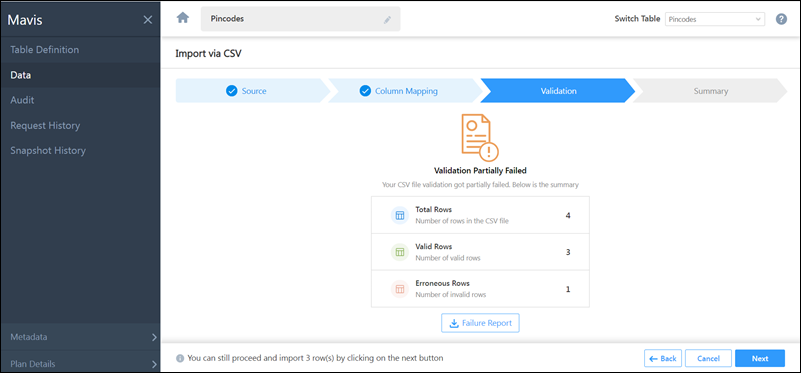
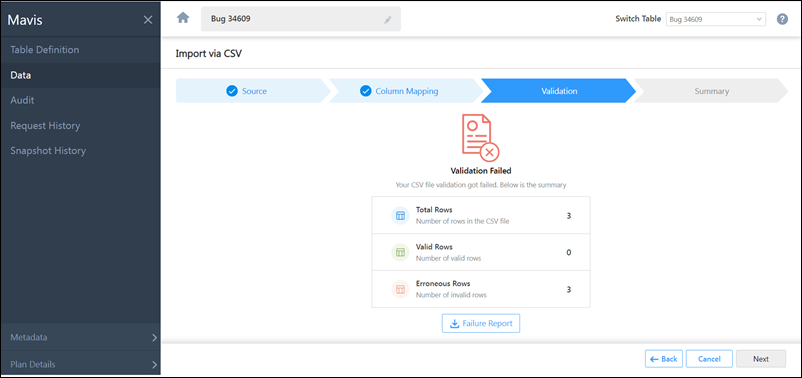
If Validation Failed –
If one or all the rows have not been successfully validated, you’ll get the Validation Failed message. There are two types of Validation Failed messages you might receive –
- Partially Failed – This means the validation for only a few rows in the CSV file failed, while the validation for the remaining rows was successful.
- Completely Failed – This means the validation for all the rows in the CSV file failed.
To rectify a failed validation –
- You’ll get the following details about the rows that were validated –
- Total Rows
- Success Rows
- Failed Rows
- Here, you can view the rows that failed during validation.
- If you want to ignore the Failed Rows error and proceed with only uploading the Success Rows in the file import process, you can do so by clicking Next.
- To download the failure report, click Failure Report.
- In the Failure Report file, you’ll see two new system-generated columns have been added – “__LSQValidationMessage” and “__LSQValidationStatus”
- The “__LSQValidationMessage” column will state the reason as to why the validation was unsuccessful for that particular row.
- The “__LSQValidationStatus” will display the validation status (“Success” or “Failed”) for that particular row.
- Once you’ve rectified the error in the original CSV file, save the file, and re-upload it from the Source screen.
- If all the rows have been successfully validated, you’ll get the Validation Success message. You can choose to continue the CSV file import process by clicking Next.
Summary
All CSV files that are imported are usually queued within our servers. It may take a few minutes for these files to be successfully imported.
In the Summary screen, you’ll get a message stating, “You have successfully imported the file.” This means your file is currently queued for import, and it will be completed within a few minutes. On this screen, you can perform the following actions –
- Check status – To know the status of the file import, click the Check status button present at the bottom of the screen. This will redirect you to the Request History screen, where you can view the current import status. The following statuses are available –
- Initiated – This means the file import has been successfully initiated. This message will be displayed until the file import is completed.
- Validation In-Progress – This means the uploaded file is currently being validated.
- Validation Success – This means the uploaded file contains no errors and is successfully validated.
- Validation Failed – This means the uploaded file contains errors, and the validation was unsuccessful. Examples of errors could be a String datatype that has more than 500 characters, an Integer datatype with a decimal value, or if a Coordinate Latitude falls outside of -90 to 90 degrees or any such errors for other datatypes.
-
Table Operation Queued – The Data Import is in the queue, and the data will be inserted into the table within a few minutes.
-
Table Operation In-Progress – This means the data is currently being pushed to the table.
-
Table Operation Failed – This means there was an error processing the CSV file. In the following scenarios, the status will change to Table Operation Failed –
- If the CSV file is corrupted
- If the CSV file does not contain any data
- If the CSV file is not CSV UTF-8 encoded
- An error occurred while processing the file
-
Table Operation Success – This means the data got successfully inserted into the table.
- View data – To view the data that was successfully uploaded (or if the file import is still in progress, then you can view the data that has been successfully imported until then), click View data.
- Import new file – To import a new CSV file, click Import new file. This will redirect you to the Source screen, from where you can import the CSV file.
Note: When the Data Import is in progress –
- All data operations (such as Add Rows, Update Rows, Delete Rows and Truncate Table) requests will be queued, until the data is imported.
- You will not be able to Add, Edit or Delete a column.
- You will not be able to perform the Restore Table action.

Update Rows through CSV
You can bulk update multiple rows across multiple columns by uploading a CSV file.
Note:
- The CSV file must have at least two columns – one unique column must be set as the Search Key and the other containing the data to be updated.
- The Search Key can be a system field
mv_RowIdor a unique column in the table.- Only 1 unique column can be defined as the Search Key. Column mapping is mandatory for this column.
- To use the system field
mv_RowIdas the Search Key, it must be present in the uploaded CSV file (mv_RowIdcan be obtained when exporting data).
- The
mv_RowIdcolumn name is case-sensitive. Ensure the syntax and case is correct. - Column mapping is not required for the
mv_RowId. - You cannot perform the Update Rows action for columns containing the User data type.
- Column mapping is required only for the columns where you want to import data.
To bulk update rows through CSV –
- On the Data screen, click
 , then click Import Rows.
 - Drag and drop the CSV file into the designated space or click the Upload or drop file… link.
- Under Select Import Behaviour, select Update existing row(s) only.
- Click Next to proceed to the column mapping tab.
- Map the fields in your CSV file to the fields in your Mavis table, then click Save.
- Select the unique column to define as the search key and click Save.
- Click Next to proceed to the validation tab. If there’s at least one successfully validated row, you can click next to complete the import. Otherwise, you can fix the errors and re-upload the file. For more details, see Import Rows -Validation.
Once you’ve imported the file, you can upload a new file, check the status (Request History tab on the left navigation pane) of your import or view the data you just uploaded.

Upsert Rows through CSV
This option allows you to update existing rows as well as add new rows to the table through the same CSV file upload action.
Note:
- The maximum table size allowed is 40GB.
- The CSV file must have at least two columns – one unique column must be set as the Search Key and the other containing the data to be updated.
- The Search Key can be a system field
mv_RowIdor a unique column in the table.- Only 1 unique column can be defined as the Search Key. Column mapping is mandatory for this column.
- To use the system field
mv_RowIdas the Search Key, it must be present in the uploaded CSV file (mv_RowIdcan be obtained when exporting data).
- If your table doesn’t contain a unique column, then the
mv_RowIdis used to identify if an existing row needs to be updated, or if a new record has to be created in the table. - The
mv_RowIdcolumn name is case-sensitive. Ensure the syntax and case is correct. - Column mapping is not required for the
mv_RowId. - You cannot perform the Upsert Rows action for columns containing the User data type.
- Column mapping is required only for the columns where you want to import data.
To upsert rows through the CSV –
- On the Data screen, click , then click Import Rows.
- Drag and drop the CSV file into the designated space or click the Upload or drop file… link.
- Under Select Import Behaviour, select Upsert (Create new record(s) & update existing).
- Click Next to proceed to the column mapping tab.
- Map the fields in your CSV file to the fields in your Mavis table, then click Save.
- Select the unique column to define as the search key and click Save.
- Click Next to proceed to the validation tab. If there’s at least one successfully validated row, you can click next to complete the import. Otherwise, you can fix the errors and re-upload the file. For more details, see Import Rows -Validation.

Search Data
Once the data has been successfully uploaded, you can find specific data within the table. To search within the data that’s been uploaded –
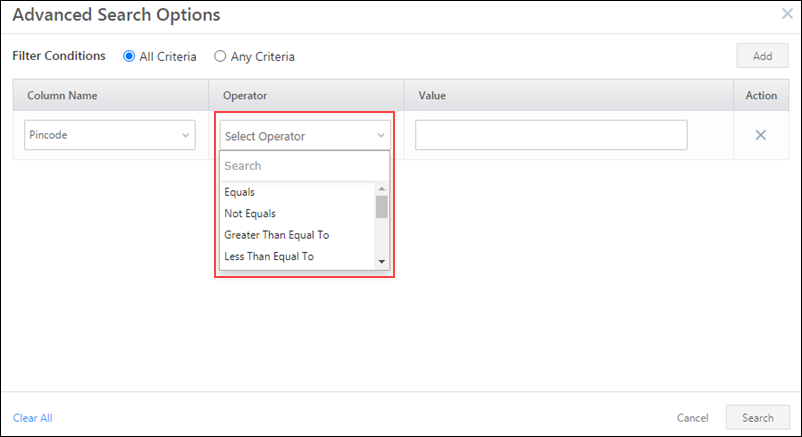
- On the Data screen, click Advanced Search.
- On the Data Search Options pop-up, select the relevant filter conditions – All Criteria (And) or Any Criteria (Or).
- From the Column Name dropdown, select the column (custom or system) within which you want to carry out the search. Only columns marked as “Is Queryable” will show up in the dropdown.
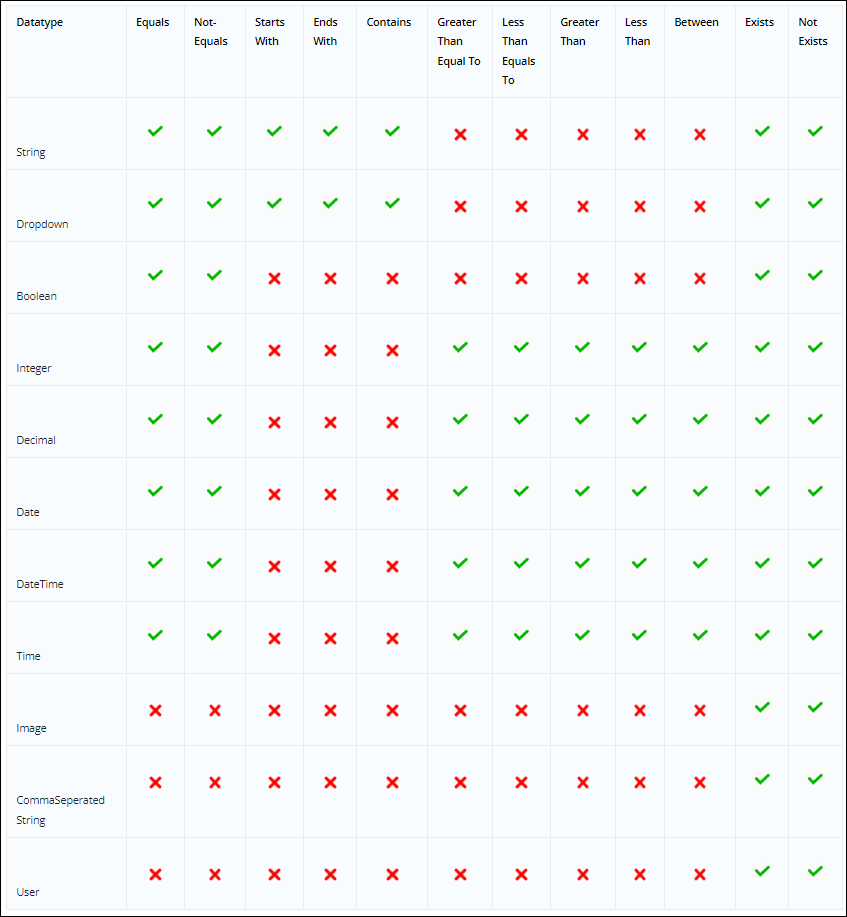
- From the Operator dropdown, select an appropriate value. The approved relational operators for each datatype are listed below.
- In the Value field, enter a relevant value.
- You can delete a search condition by clicking
 , present under Actions.
 - To add further search conditions, click the Add button.
- Once you’re done adding conditions, click Search. This will return the relevant data field(s). You can view the number of conditions you’ve set on the Advanced Search button.
Note:
- User specific advanced search filters, column ordering and sorting are retained when navigating from one tab to another (e.g., from the data tab to the audit tab and back) or refreshing the page.
- By default, you can add a maximum of 22 filter conditions. If you want to add more filter conditions, contact support@leadsquared.com.
- You can apply Advanced Search on both custom and system fields.
- Only columns marked as Is Queryable can be used in the search filter.
- Coordinate, JSON, Text columns cannot be marked as “Is Queryable”.
- Mavis supports case-insensitive search.
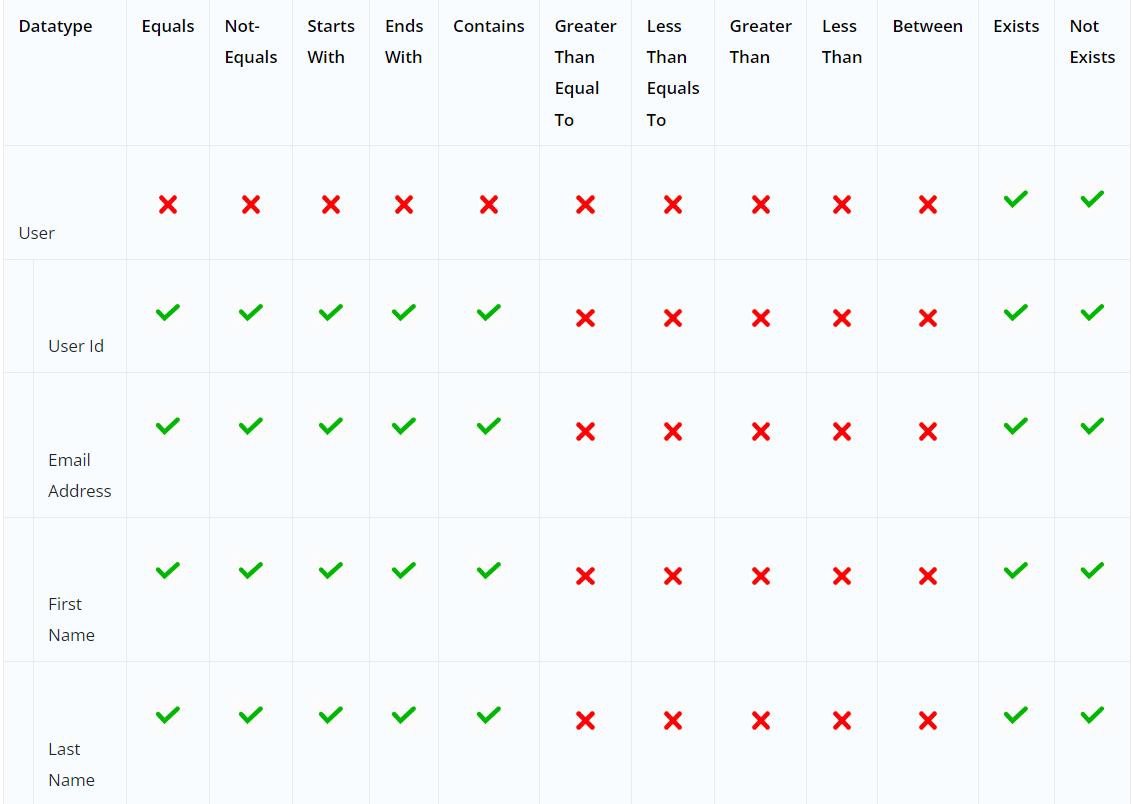
The following Relational Operators are available on the Data Search Options pop-up for each data type –
Search User Data
When searching for user data within a Mavis table, you can search by User Id, Email Address, First Name, and Last Name fields.*
*Note: First Name and Last Name will only appear as options to search by if you include them while configuring the user type column.
Operators supported in Advanced Search for the user field and sub-fields –
Click the user’s name to view more details.
Re-order Columns
You can re-order columns on the table by dragging and dropping them.
Note: User specific advanced search filters, column ordering and sorting are retained when navigating from one tab to another (e.g., from the data tab to the audit tab and back) or refreshing the page.
Update a Row
To update an individual row within the table –
- Select the row you want to update by clicking the
 checkbox.
 - Hover your cursor over the menu, and click Update Row.
- On the Update Row screen, update the values in the relevant fields.
- Once you’re done, click Update. You’ll get a message saying, “Row updated successfully”.
- To undo the changes, click Cancel.
Note:
- You can only update one single row at a time.
- Users cannot update rows under System field columns since these details are captured by the system and aren’t editable.
Bulk Update Rows
To bulk update multiple rows across the same column –
- Alongside the rows you want to update, click
 .
.
- To update all the rows present on the current page, on the column header, click .
- To update all the rows present on the current page, on the column header, click
- Hover your cursor over
 , and click Bulk Update.
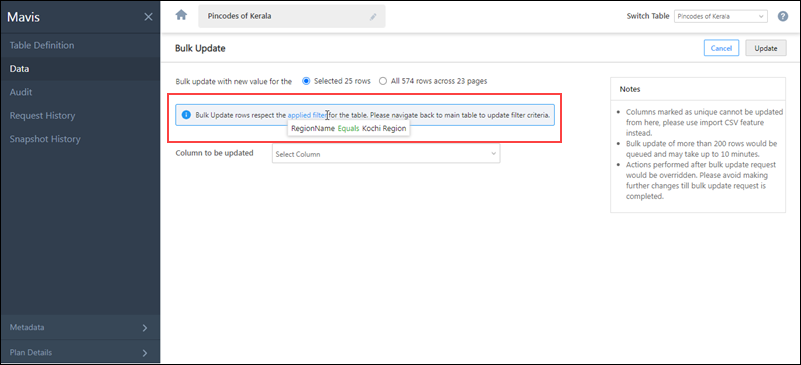
 - On the Bulk Update screen, from the Column to be updated dropdown, select the column you want to update.
- If you’ve selected all the rows on the current page to be updated, alongside Bulk update with new value for the…, you’ll have the option to update rows only on the current page, or update all the rows across the entire table.
- The Bulk update with new value for the selected … row(s) will show up if you’ve manually selected only a few rows to be updated on the current page.
- In the New Value box, enter the updated value of the selected column.
- Once you’re done, click Update.
- On the Bulk Update pop-up, verify if all the details are correct, and click Confirm. You’ll get a message saying, “Row(s) updated successfully”.
Note:
- Only non-unique columns can be bulk updated. To update unique columns, use the Import Rows feature.
- Users cannot update rows under System field columns since these details are captured by the system and aren’t editable.
- Bulk update requests for more than 200 rows may take a couple of minutes to execute.
- Mandatory fields are differentiated through *.
If you’ve applied Advanced Search filters, you’ll only be able to update rows selected based on the filters applied.
Add a Row
To add an individual row within the table –
- Above the table, click Add Row.
- On the Add Row screen, enter values in the relevant fields, and click Add. The row is successfully saved.
Note:
-
- The maximum table size allowed is 40GB.
- You can only add one single row at a time.
- When you add a row, the data under system columns will be automatically captured.
Delete Rows
To delete up to 200 rows within the table –
- Select the rows you want to delete by clicking the checkbox against those rows.
- To select bulk rows, increase the number of rows in a page from the Show dropdown, and select all the rows by clicking the checkbox in the table header.
- To select bulk rows, increase the number of rows in a page from the Show dropdown, and select all the rows by clicking the
- Above the table, click Delete.
- To cancel deleting the rows, click Cancel.
To delete more than 200 rows –
- You must apply relevant Advanced Search filters.
- After applying it, click on top of the grid.
- Above the table, click Delete.
- On the Delete Rows pop-up, to delete all the rows available under this filter, select Delete all filtered rows, and click Delete
- To only delete rows present on that particular page, select Delete filtered rows on this page.
Note: If you have selected more than 200 rows to delete, the request will then be queued, and its status can be tracked in the Request History screen.
Truncate Table
This action will delete all the data stored in that particular table.
- Hover your cursor over the menu, and click Truncate Table.
- On the Truncate Table pop-up, enter the table name you want to truncate.
- Then, click Confirm. You’ll get a message saying, “Truncate table request has been accepted”, and you will automatically be redirected to the Request History page.
- To cancel truncating the table, click Cancel.
Export Data
To export data out of Mavis Table –
- Select the rows you wish to export.
- To export specific rows, alongside the row, click .
- To export all rows in that page, alongside the table header, click .
- To export specific rows, alongside the row, click
- Hover your cursor over , and click Export Data.
- On the Export Data pop-up –
- If you’ve selected specific rows in the table grid, a message with the number of rows being exported will be displayed. For example, if you’ve selected 4 rows, “Number of row(s) to export: 4” will be displayed.
- If you’ve selected all rows of the page in the table grid, you will get an option to export the selected rows or all rows across all pages.
- Once you’ve selected the rows to be exported, you can choose to Export All Columns or Export Selected columns.
- If you select Export Selected columns, you will be able to choose specific columns you wish to export. Alongside the columns you want to export, click .
- If you select Export All Columns, the data in all the columns of your Mavis Table will be exported.
- If you want to export the Row ID, alongside Include Row ID in Export, click .
- If you select Export Selected columns, you will be able to choose specific columns you wish to export. Alongside the columns you want to export, click
- Once you’re done, click Export.
- On the Export Data popup, click here. This redirects you to the Request History screen.
- On the Request History screen, against the Export Table request, hover your cursor over, and click Download.
Note:
- If you do not select specific rows while exporting data, all rows across all pages will be exported.
- You will only be able to export up to 5GB of data.
- When you’re exporting User data type fields, the values for all user fields will be present (in the JSON format) inside a single cell in the CSV file
- When you’re exporting User data type fields, you can select specific subfields for export.
Next Steps
To know how to audit a table, please refer to Table Audit.


